A step-by-step guide to connecting your Instagram and Facebook accounts to KwikEngage and setting up comment-to-DM automation.
1. Overview
This guide walks you through connecting your Instagram and Facebook accounts to KwikEngage and setting up comment-to-DM automation — for example, a customer comments "Price Please" on your post and automatically gets a DM back. Screenshots below are from a live walkthrough; account names, balances, and post images have been blurred for privacy. Your own screens will show your brand's data instead.
2. Before you start
Your Instagram account is a Business account. If it's still personal, convert it: Settings → Account → Switch to Professional Account.
Your Instagram Business account is linked to a Facebook Page: from your Instagram profile, go to Edit profile → Public business information.
You are the admin of both the Instagram Business Account and the Facebook Page.
Message access for third-party apps is enabled: Settings → Privacy → Messages, toggle on message access.
Your KwikEngage account is provisioned with access to the Marketing & Retention module (sidebar: Flows, Integrations, Configurations).
Your products will reflect under the Product Linker which you will need to link at your end. — without this, the Instagram comment/DM flow will not function.
3. Connect the accounts
Log into KwikEngage, select Getting Started from the left sidebar, click the Instagram icon, and select Connect with Facebook.
Log in with your Facebook credentials.
Select All Facebook Pages and click Continue.
Choose your specific Instagram account, click Continue, then Save, then Got it.
Select your connected Facebook Page, check both DM and Comment, and click Submit.
Open your Inbox to verify that DMs and comments are coming in.
These connection steps are confirmed against KwikEngage's official Instagram Implementation Guide.
4. Verify the connection
Go to Marketing & Retention → Flows (or the automation/trigger screen) and open "Select Instagram publication" / "Link your Instagram".
Check the Posts / Stories / Ads tabs:
"No Data" / "No posts found" → your account isn't connected yet, or posts haven't synced. Go back to Integrations and reconnect, or wait for sync.
Posts appear with dates and an "Items Linked" column → you're connected and posts are pulling in.
Check both Instagram and Facebook before building automations — building against an unconnected account will silently fail to find posts later.
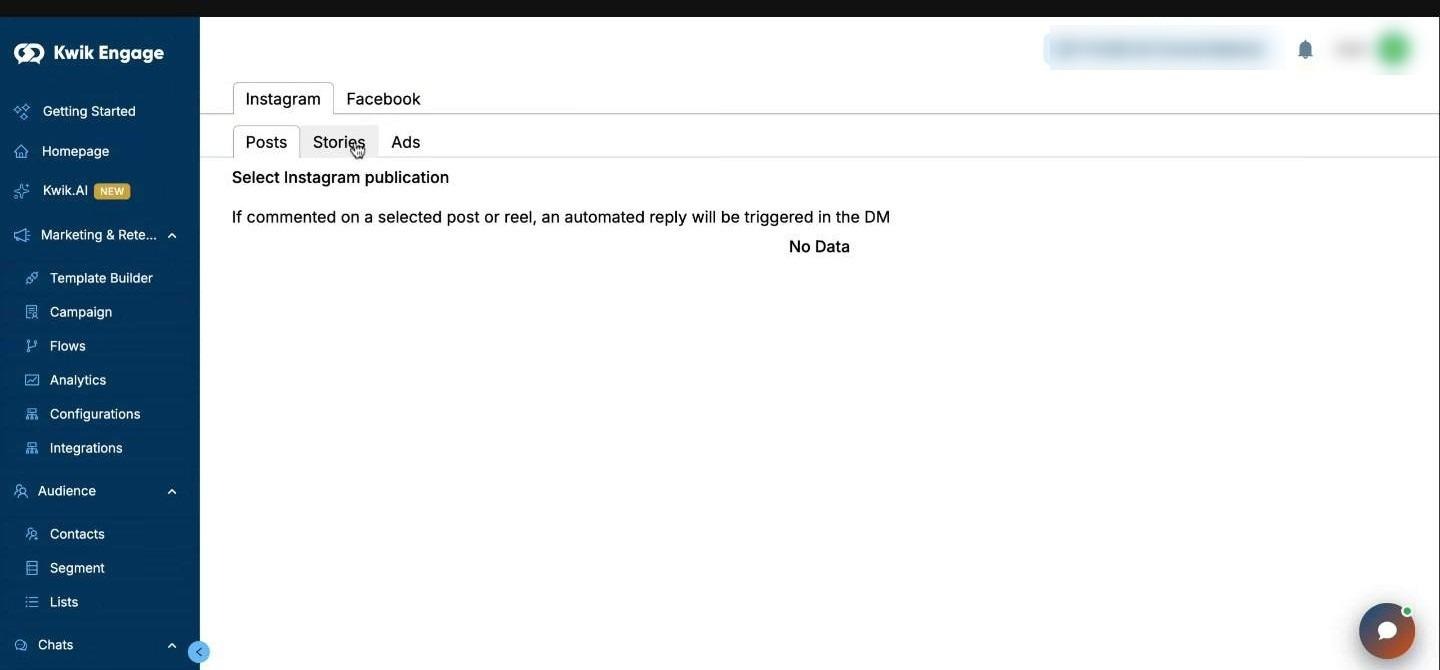
Example: account not yet connected — you'll see "No Data" until your Instagram/Facebook posts sync (name and balance blurred for this example).
5. Create your automation flow
Go to Flows → Pre-Defined Journeys → Social Media Journeys tab.
Browse ready-made templates:
Instagram Flows: Engage With Your Followers, Follow First Then Interact, Lucky Giveaway, Generate Leads with Posts, Respond to All Your DMs, Engage Using Story, Generate Leads with Story.
Facebook Flows: Comment Automation, Comment PP (Price Please), DM Automation.
Click Edit on a template to customize it for your brand, or Build From Scratch to start your own.
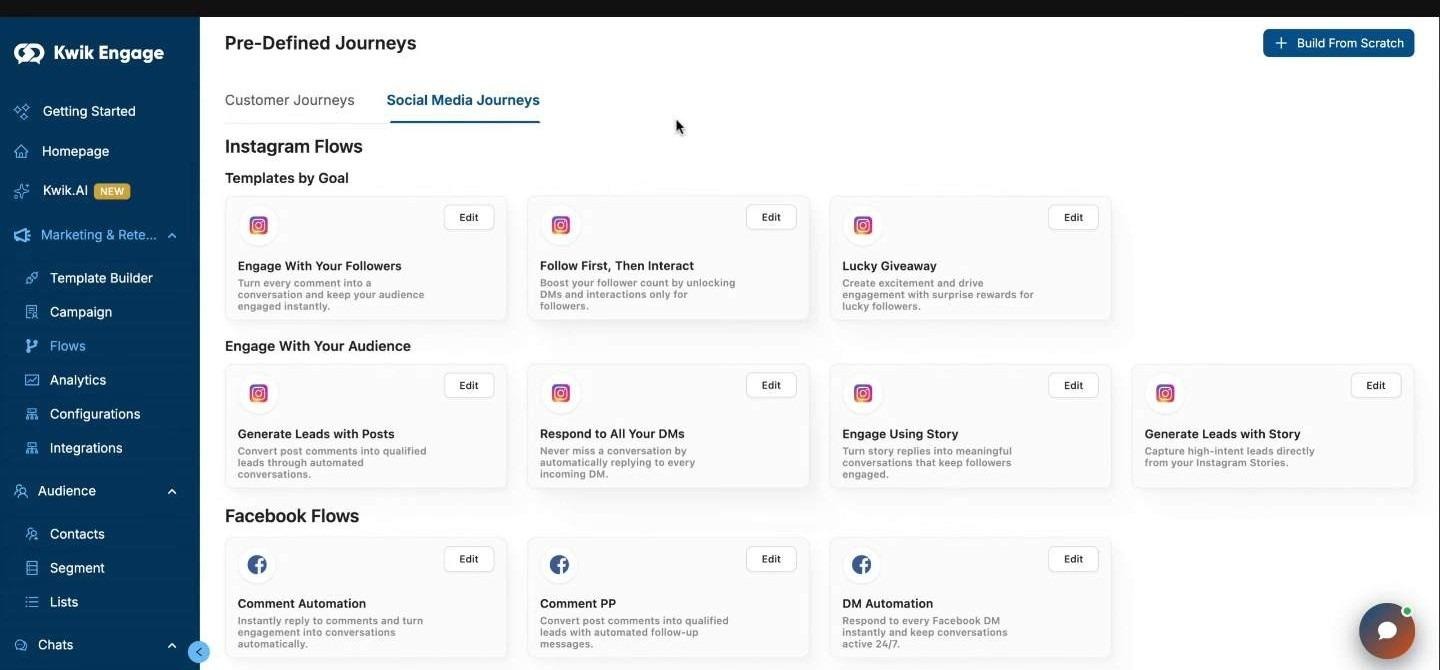
The Social Media Journeys template gallery — pick a ready-made Instagram or Facebook flow, or build your own from scratch.
6. Configure the Trigger node
Open the Trigger node on the flow canvas.
Set Trigger Type: Instagram or Facebook.
Set the trigger event, e.g. Comment on Post/Reel, Comment (Price Please), or Direct Message.
Set Automation Type to Marketing.
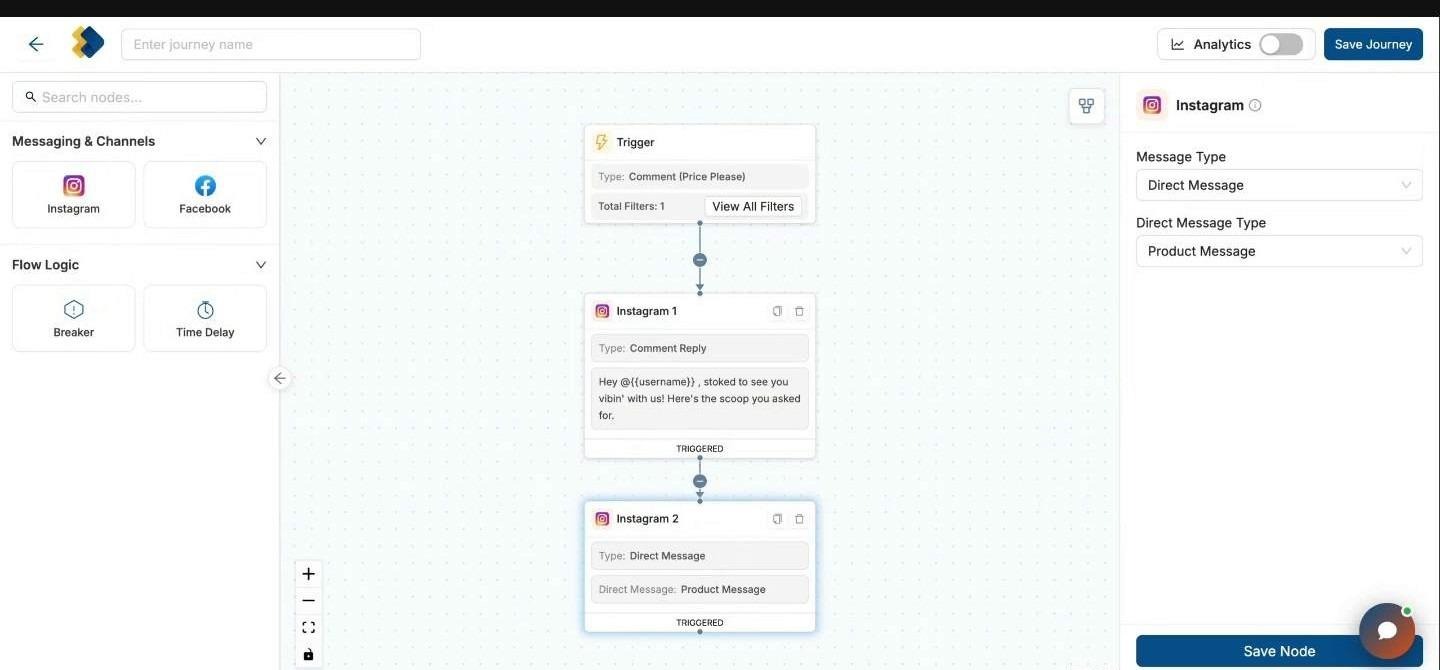
A configured flow: an Instagram comment trigger feeding a Comment Reply node and a Direct Message node.
7. Apply your comment filters
Click Edit Filter on the Trigger node — this is the Product Linker filter.
Choose scope: All Posts, Reels and Ads or Specific Post/Reel/Ad.
Choose condition: e.g. Contains Specific Words.
Add "Comments include these keywords" (e.g. price, price please) and "Comments exclude these keywords" to filter out spammy or irrelevant comments.
Link up to 10 products per post, story, or ad.
Name the filter (e.g. "Product Linker") and click Apply Filters.
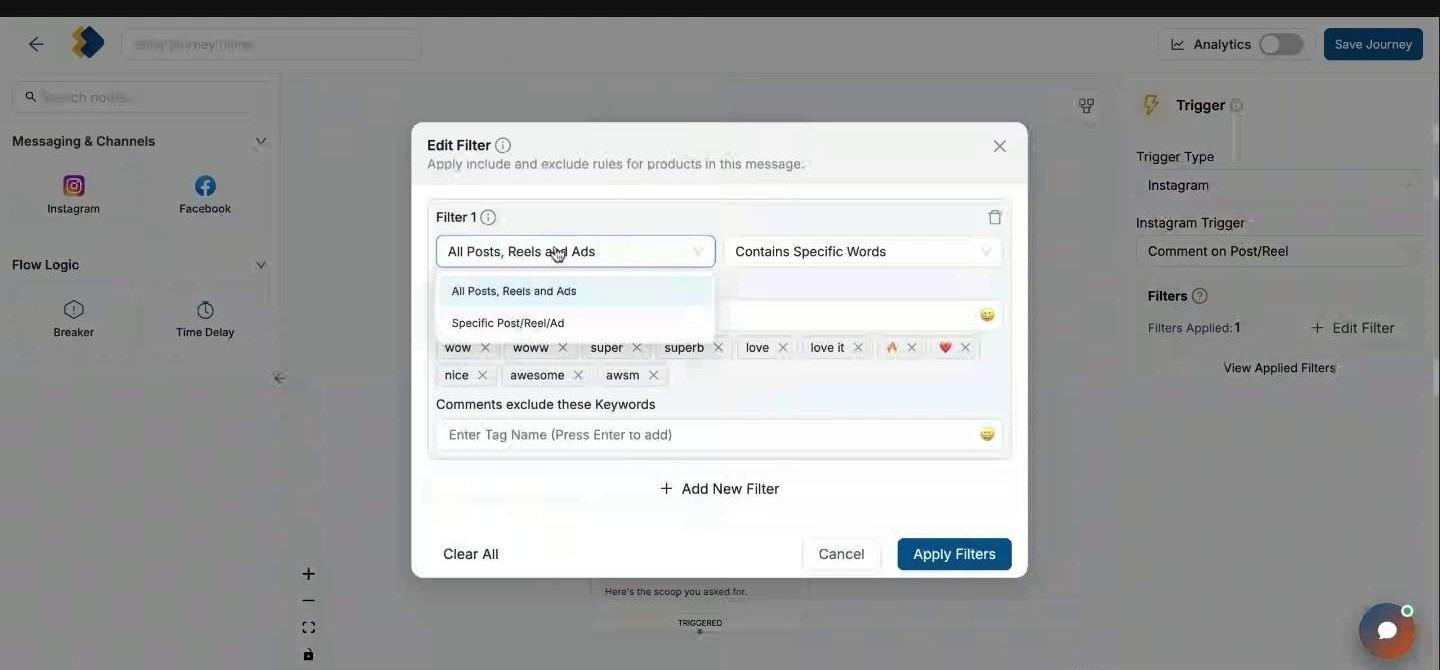
Keyword include/exclude rules for a comment trigger.
8. Link a specific post/reel (if you scoped to one)
If you chose Specific Post/Reel/Ad, open Link your Instagram / Select Instagram publication.
Switch between Posts / Stories / Ads tabs and search for your post.
Select it — once linked, you can attach a product catalog via Update Product(s) if you're running a comment-to-DM product flow.
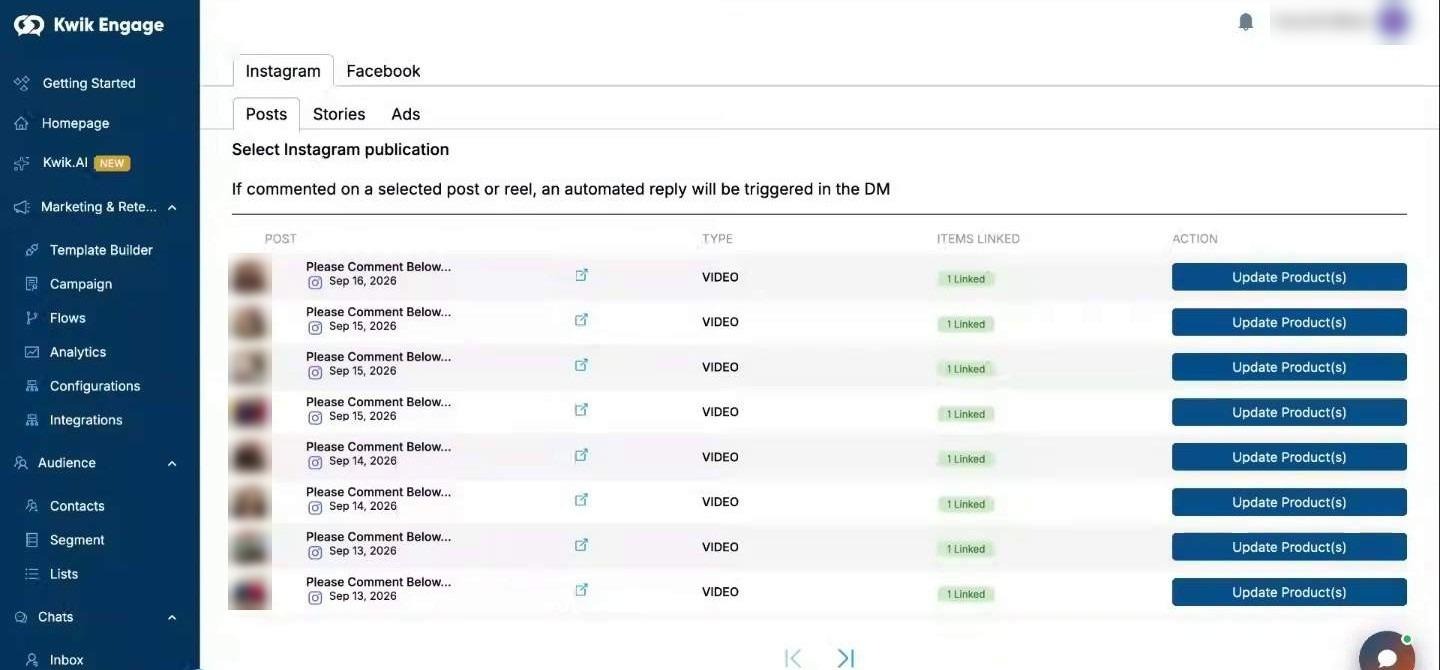
Once your account is connected, your posts show up here for linking (post thumbnails and account name blurred for this example).
9. Configure your response node(s)
Add/open an Instagram or Facebook response node after the Trigger.
For a Comment Reply node: set your reply text (supports variables like {{username}}), e.g. "Hi! Thank you for vibing with us."
For your second message, choose one:
Direct Message — a text-only message (e.g. pricing or basic info).
Product Message — includes the product image and a clickable link to the product.
Chain further nodes (e.g. Time Delay → follow-up DM) as needed using Flow Logic blocks (Breaker, Time Delay) from the left panel.
Instagram platform limitation: you can send either a Direct Message or a Product Message in reply to a comment — not both in the same flow.
10. Save, test, and go live
Click Save Node to save each node you configure, then Save Journey to save the whole flow.
Go to Automations. Use the All / Live / Sandbox / Disabled tabs to find your flow.
Test in Sandbox first — comment on your linked post/reel yourself and confirm the reply and/or DM fires correctly before it goes out to all your followers.
Once you're happy with it, move the flow to Live.
Use Search by Automation Name and Filter to manage flows as your list grows; each row shows Channel, Category, Status, Created/Updated At, and Count.
11. Troubleshooting
12. Notes
This guide was reconstructed from a screen recording (no audio transcript was available) by sampling key frames of the KwikEngage UI, cross-checked against the official help article below. Any merchant name, balance, or post image you see in the screenshots above has been blurred — your own account will show your brand's details in those spots. If any screen name or menu path here doesn't match what you see, check with your KwikEngage contact.
Additional Resources:
Was this article helpful?
That’s Great!
Thank you for your feedback
Sorry! We couldn't be helpful
Thank you for your feedback
Feedback sent
We appreciate your effort and will try to fix the article
