Self-Serve Onboarding Guide for Shopify Brands
This guide walks you through connecting WhatsApp Business API to your Shopify store in 10 steps, about 15–20 minutes. By the end you'll have a live WhatsApp Business Account, a verified phone number, ₹100 free WhatsApp credits, and 14 days of premium access.
Before You Begin
Have these four things ready. Missing any one will block you mid-process.
- Phone number — active, SMS/call-reachable, not currently signed into any WhatsApp app, and not already registered on another WhatsApp API provider.
- Meta Business Suite access — Admin or Manager role on your Facebook / Meta Business account.
- Brand details — brand name, business email, website URL, business category.
- Shopify access — store owner or admin with app-install permissions.
⚠ Already used this number on WhatsApp or another API provider? If the number is signed in to regular WhatsApp or WhatsApp Business app: open WhatsApp → Settings → Account → Delete Account, then wait 3–5 minutes before starting Step 1. If the number was previously used on another WhatsApp API provider: 1. Disable two-step verification on the number — via the previous provider's dashboard or via Meta's WhatsApp Manager. 2. If the number is on another WABA, migrate or delete it from the source Business Manager. 3. Wait 15 minutes, then start from Step 1 of this guide. Full migration guide: docs.kwikengage.ai/support/solutions/articles/82000914327 |
Process: Steps 1–3 install & sign up → Steps 4–7 connect Meta → Steps 8–10 add & verify number.
Phase 1 — Install & Sign Up
STEP 1 | Install KwikEngage from the Shopify App Store |
In Shopify admin: Settings → Apps and sales channels → Shopify App Store → search KwikEngage → Install → approve permissions.
Tip You must be the store owner or have app-install permissions. If Install is greyed out, ask your Shopify admin for access. |
STEP 2 | Create your KwikEngage account |
Once installed, a sign-up screen opens automatically. Fill in the five fields below and click Start Your Free Trial.
Field | What to enter |
Full Name | Your brand name (2 words works best). |
Login Email | Business email — OTP will be sent here. |
Brand Name | Same as Full Name |
Password | Minimum 8 characters, mix of letters and numbers. |
Number | Your contact number for KwikEngage to reach you (account updates, support, onboarding follow-ups). Do NOT enter the number you plan to integrate with WhatsApp API — that gets added later in Step 8. |
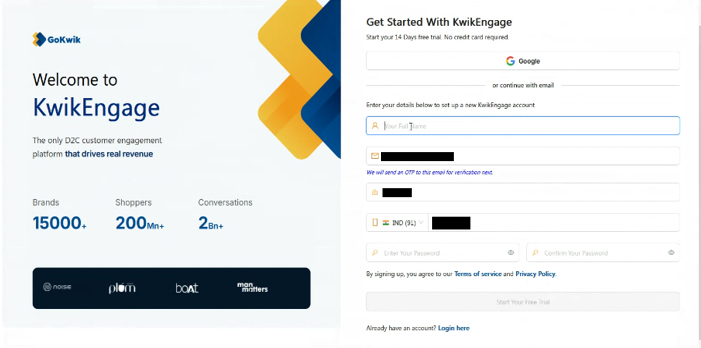
Figure 2.1 — Sign-up form. Click Start Your Free Trial when done.
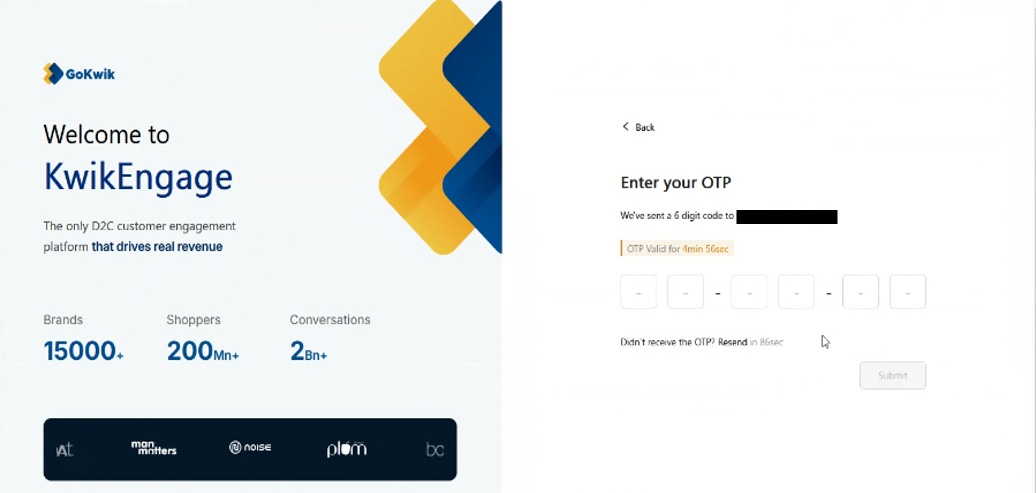
Figure 2.2 — Enter the 6-digit OTP sent to your email (valid for 5 minutes).
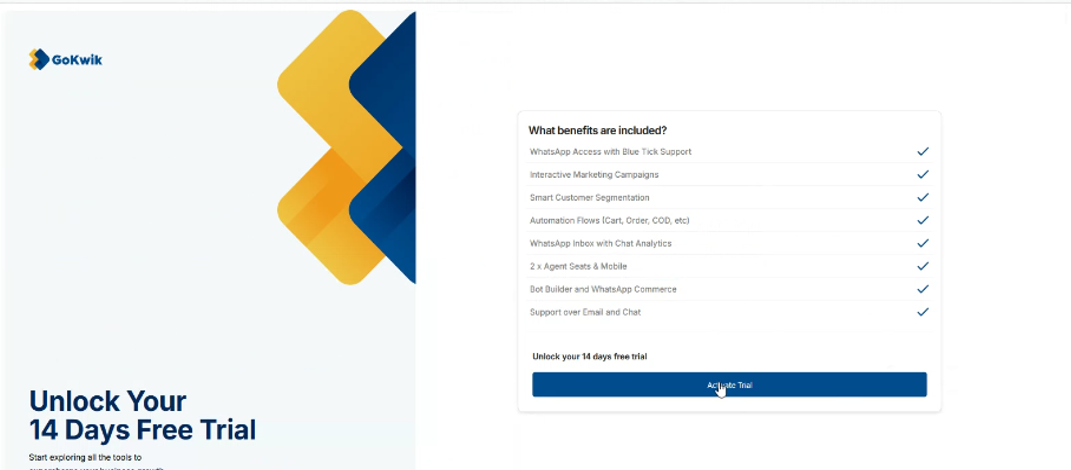
Figure 2.3 — Click Activate Trial to proceed. No credit card needed.
STEP 3 | Your account is ready |
Three things happen automatically: 14-day trial starts, Shopify store connects, and you land on the Getting Started dashboard.
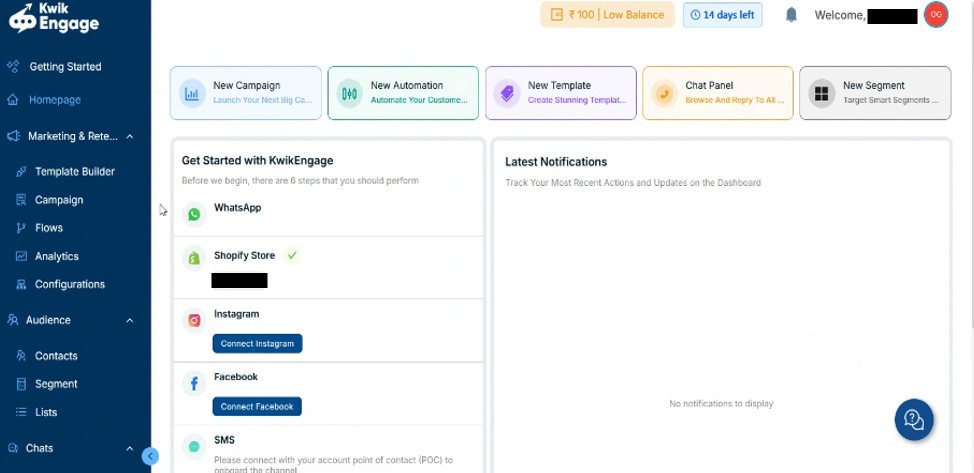
Figure 3.1 — Dashboard home. Shopify shows a green tick; WhatsApp is next.
Phase 2 — Connect Meta
STEP 4 | Open the Connect WhatsApp flow |
Click Getting Started on the sidebar → click Connect WhatsApp on the right.
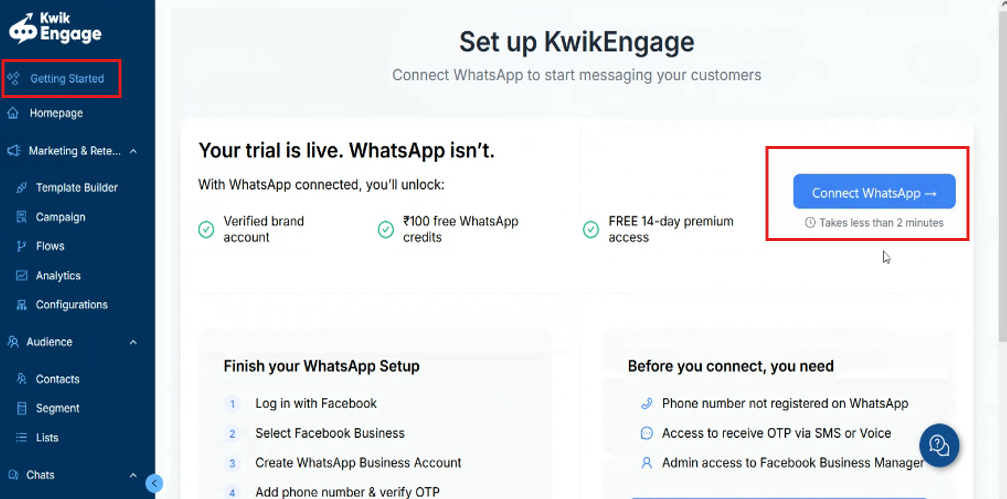
Figure 4.1 — Click the blue Connect WhatsApp button. Takes under 2 minutes.
STEP 5 | Start the Facebook login flow |
A new window opens titled "Seamlessly connect your account to GoKwik and Pinnacle Teleservices". This is Meta's official flow (hosted on facebook.com). Scroll to the bottom and click Continue.
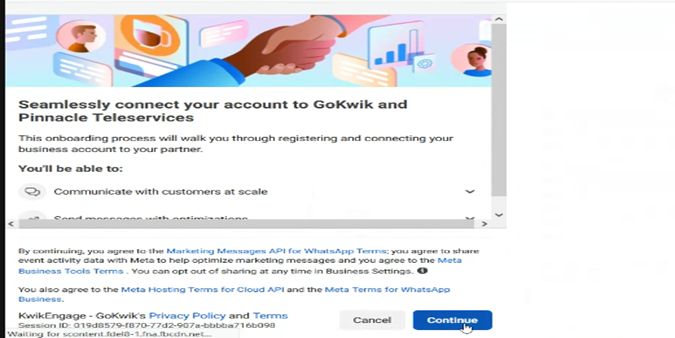
Figure 5.1 — Review the terms and click Continue at the bottom right.
STEP 6 | Select your Business Portfolio |
Do two things on this screen, then click Next:
- Select your Business Portfolio (pre-selected if you have only one).
- From the WhatsApp Business account dropdown, choose Create a WhatsApp Business account.
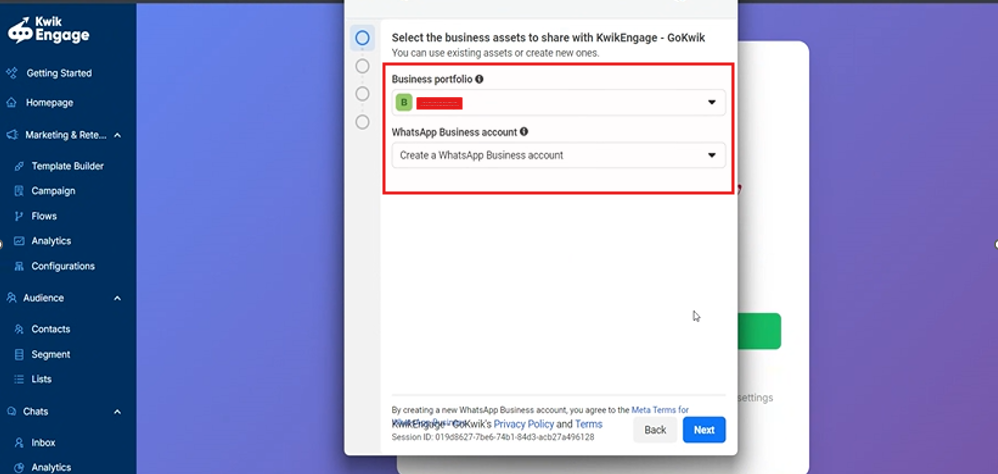
Figure 6.1 — Select Business Portfolio, then choose Create a WhatsApp Business account.
Tip To reuse an existing WABA, pick it from the dropdown instead — but the WABA must not already contain the phone number you plan to add. |
STEP 7 | Enter your business information |
Fill in the business profile for your new WhatsApp Business Account, then click Next.
Field | What to enter |
Name | Internal WABA name — visible only inside your Meta Business Portfolio. |
Category | Best fit for your business (Clothing, Beauty, Electronics, etc.). |
Country | Defaults to India. Change if needed. |
Website | Your store URL (required if not already set on the portfolio). |
Time zone | Defaults to Asia/Kolkata. Change if your business runs in another zone. |
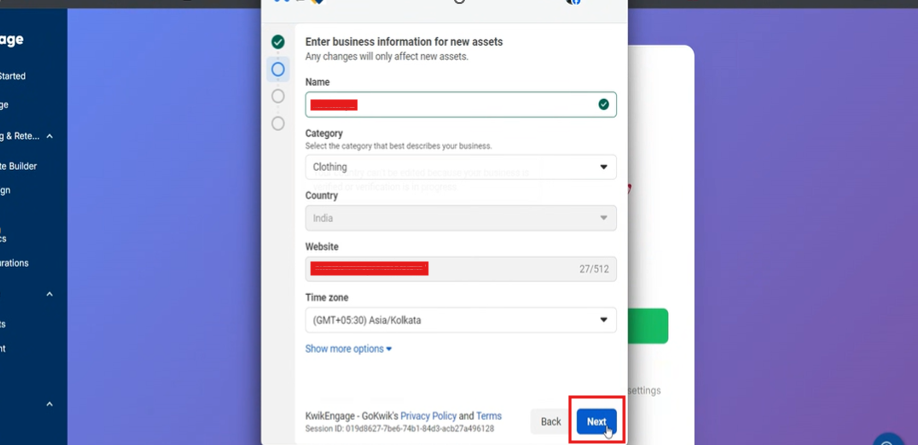
Figure 7.1 — Business information form. Click Next when done.
⚠ Important This Name is NOT the customer-facing display name. You'll set that in Step 8. |
Phase 3 — Add & Verify Number
STEP 8 | Add your WhatsApp phone number |
Click Add a New Number, then enter your phone number (with country code, e.g. IN +91) and your WhatsApp display name — what customers will see in chat.
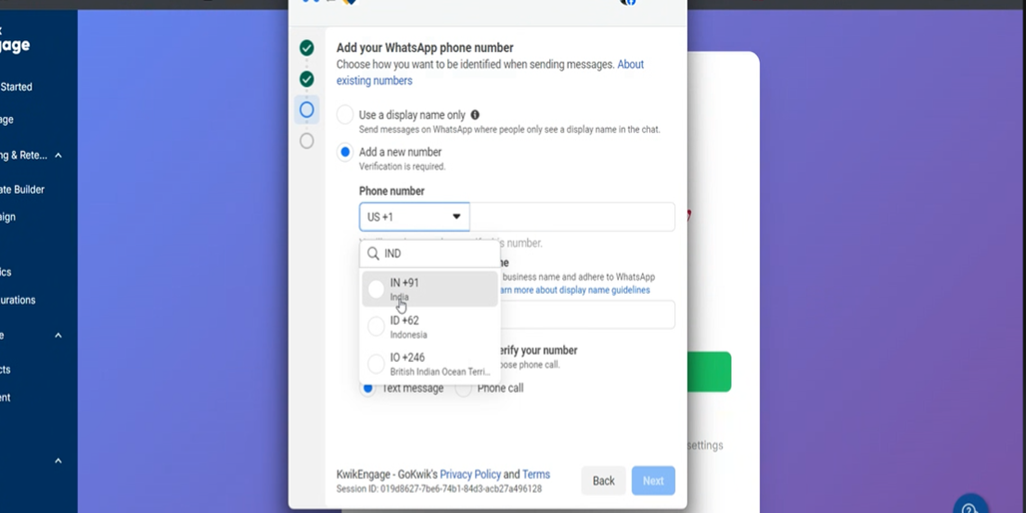
Figure 8.1 — Enter phone number with country code and WhatsApp display name.
Display name rules Must relate to your brand name. No generic words (Support, Care, Help), no emojis, no ALL CAPS. Meta reviews within a few hours. |
⚠ Seeing "not a valid phone number"? Usually means the number is already on another WABA, two-step verification is still enabled, or the country code is wrong. See Troubleshooting. |
STEP 9 | Verify the number via OTP |
Choose Text message (recommended) or Phone call (for landlines or if SMS fails), click Next, then enter the 6-digit code you receive.
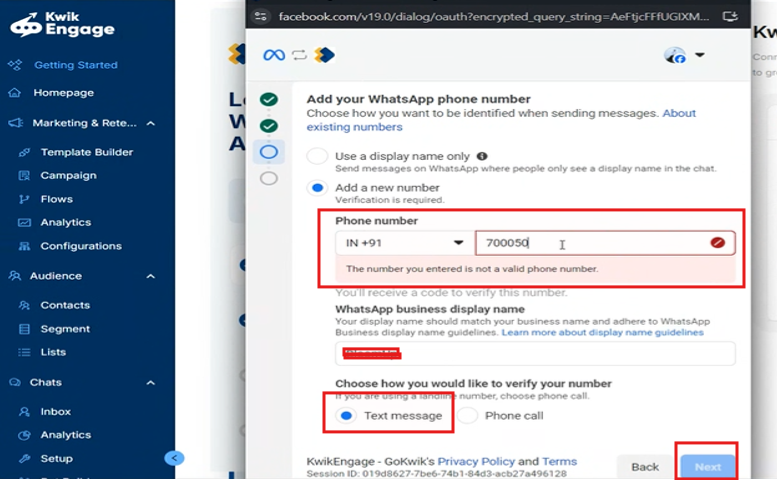
Figure 9.1 — Select Text message or Phone call, then click Next.
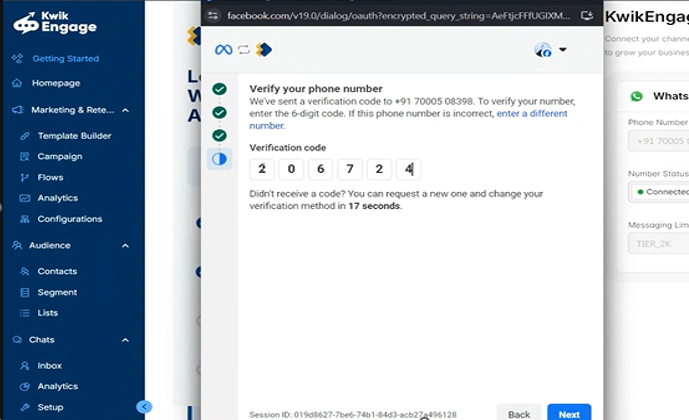
Figure 9.2 — Enter the 6-digit code. Can request a new one after ~17 seconds.
STEP 10 | Wait for the connection to finalise |
Meta now takes a few seconds to finalise. You'll see "Connecting your account…" — don't close the window. It usually completes in under 2 minutes.
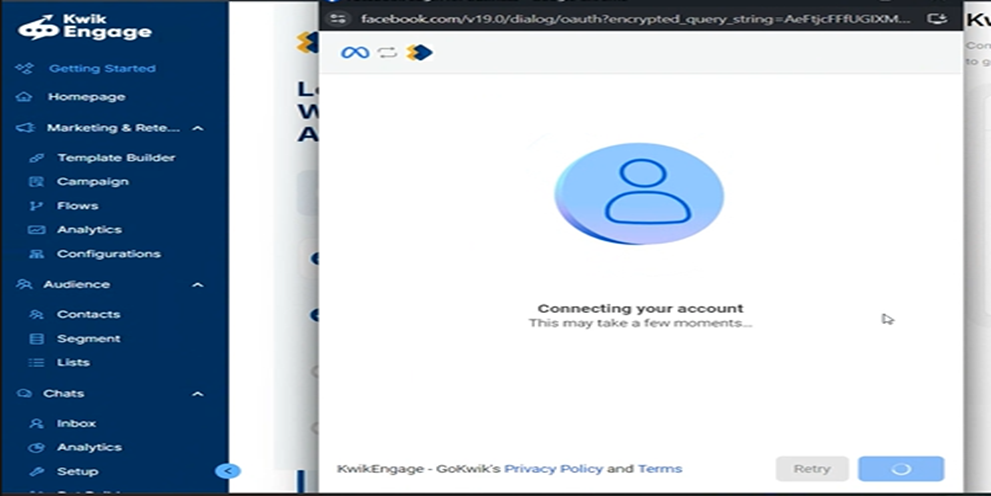
Figure 10.1 — Meta finalising the connection. Wait for it to complete on its own.
⚠ OTP didn't arrive? Don't hit Resend yet. Meta allows only 2 OTP attempts per number. If the 1st OTP doesn't arrive, first confirm the number can receive SMS or phone calls (try sending a regular SMS or making a test call). Only click Resend once you've confirmed the issue isn't on your side. After the 2nd failed attempt, the number goes into a 24-hour cooling period, and you won't be able to retry until it expires. |
✅ You're done when… The window closes automatically and KwikEngage shows WhatsApp as Connected (green dot) with a messaging tier (e.g. TIER_2K). Your WhatsApp Business API is live. |
Was this article helpful?
That’s Great!
Thank you for your feedback
Sorry! We couldn't be helpful
Thank you for your feedback
Feedback sent
We appreciate your effort and will try to fix the article