1. Purpose
This SOP documents every section of the AI Chatbot Setup module in the KwikEngage panel — the Setup Wizard, Knowledge Sources, Integrations, and Test & Deploy tabs — so that any brand can configure and launch its AI chatbot independently. All examples below are illustrative placeholders; replace them with the brand's own details.
Availability: The Omni-Channel AI Bot is a paid add-on (fixed monthly fee where applicable, plus usage-based charges). To know the pricing details, please reach out to your account POC or email at kcs@gokwik.co.
2. Prerequisites
Access to the KwikEngage panel with permissions to the AI Chatbot Setup module.
Store/product catalog connected and ready to sync (e.g. Shopify).
Brand details ready: brand name, industry/category, key USPs, desired chatbot tone, and any topics the bot should avoid.
Shipping, return, exchange and cancellation policy details, in days.
A WhatsApp number (and/or Instagram/Facebook handles) to use for sandbox testing.
Logistics/order-tracking provider details, if real-time tracking is to be enabled.
Typical Setup Time: For a catalog of roughly 100 products, end-to-end setup (wizard + knowledge upload + logistics connection + testing) typically takes about 30 minutes.
3. Where to Find It
In the left navigation panel, go to Chats → AI Chatbot Setup.
The page header reads “AI Chatbot Setup — Create, train, test, and deploy your bot in just 30 minutes.”
A status banner at the top shows the bot's readiness, e.g. “Your bot is ready — Indexed at [date/time]. Your bot can now answer product questions,” with a progress bar reflecting indexing status.
Note: The banner reflects product catalog indexing status. If the bot was recently connected or the catalog was recently updated, allow time for re-indexing before this shows 100% ready.
Four tabs run across the top of the page: Setup Wizard, Knowledge Sources, Integrations, and Test & Deploy. These are covered in order below.
4. Tab 1 — Setup Wizard
The Setup Wizard has four steps shown as a left-hand stepper: Brand (Identity & Tone) → Agent Handoff (Escalation Rules) → FAQ (Q&A Pairs) → Policies (SLAs & Rules).
4.1 Brand — Identity & Tone
Section intro: “Tell us about your brand — Your answers shape every response the bot sends. Takes about 2 minutes.”
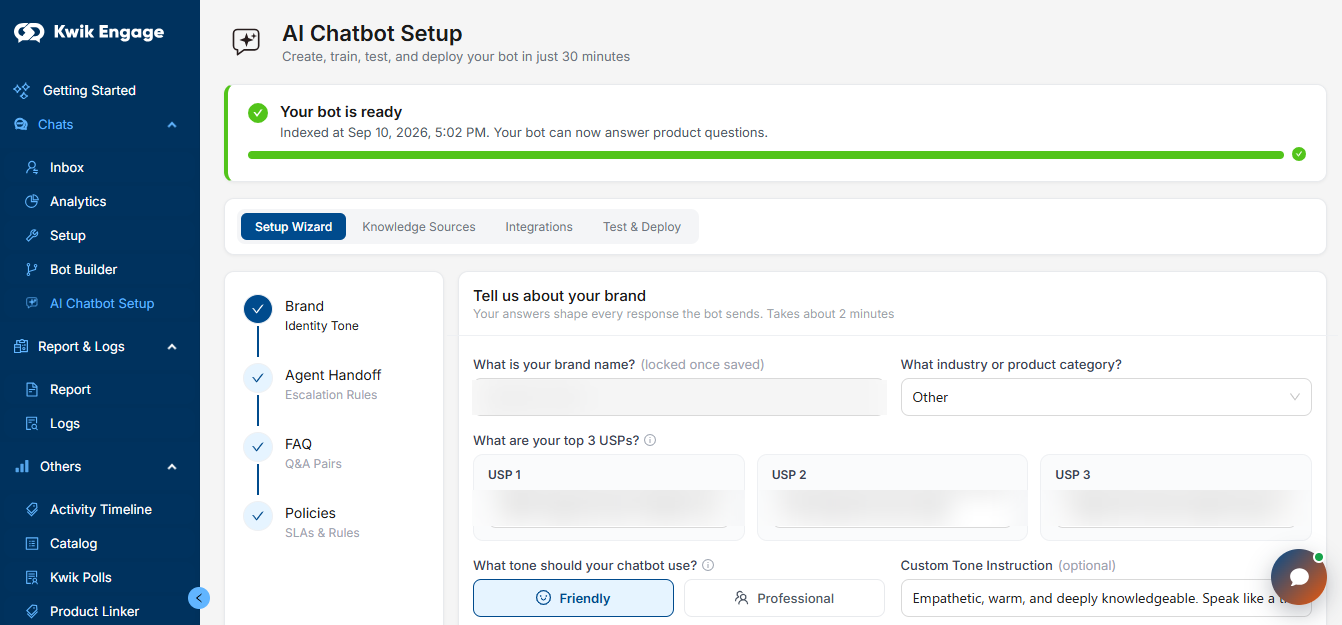
Figure 1: AI Chatbot Setup — Brand (Identity & Tone) step, with the status banner and top-level tabs visible. Brand name and USP fields blurred.
Field — What is your brand name?: Text field, e.g. “Your Store Name.” Marked (locked once saved).
Note: The brand name cannot be edited again after the first save — double-check spelling before saving.
Field — What industry or product category?: Dropdown selection, e.g. Fashion, Beauty, Electronics, Other.
Note: Choose the closest matching category — it shapes how the bot frames product-related responses.
Field — What are your top 3 USPs?: Three separate text fields (USP 1, USP 2, USP 3), e.g. “Fast pan-India delivery,” “100% authentic products,” “24/7 customer support.”
Field — What tone should your chatbot use?: Choice: Friendly, Professional, Quirky, or Neutral.
Field — Custom instruction (optional): Free-text field, e.g. “Empathetic, warm, and knowledgeable. Speak like a helpful expert.”
Field — Topics to avoid (optional): Free-text field listing any subjects the bot should steer clear of in its replies.
Note: Both optional fields can be left blank initially and refined later based on live-testing feedback.
Click Save and Next to proceed to Agent Handoff.
4.2 Agent Handoff — Escalation Rules
Defines when the bot should stop responding and hand the conversation to a human agent. Handoffs carry the full conversation history, so the agent picks up with complete context — the customer never has to repeat themselves.
Talk to a human is always on and cannot be turned off — if a customer asks for a person, the bot always hands off.
Toggle on preset scenarios as needed, e.g. Complaint or Escalation.
To add more triggers, click the “+” icon and choose Add Custom Scenario, describing the condition as free text.
Save once all desired scenarios are configured.
Note: This step configures the escalation RULES only. The actual agent accounts/logins who receive these handed-off chats are configured separately — see Section 8, Agent Accounts (Setup → Agents).
4.3 FAQ — Q&A Pairs
Optional. Six category-based starter FAQs are suggested automatically based on the brand's industry (e.g. “What is your return policy?”, “How do I track my order?”).
Keep the suggested FAQs as-is, edit the response text, or delete them.
Add new Q&A pairs as needed.
Note: Policies set in the next step (4.4) auto-fill the matching FAQ answers — shipping, return/exchange, and cancellation details only need to be entered once.
4.4 Policies — SLAs & Rules
One place to set shipping, returns, and cancellation rules. Set once — they flow into the matching FAQ answers automatically. All timelines are expressed in days.
Enter minimum delivery days, maximum delivery days, and maximum shipping days.
Note: A breach of the configured shipping/delivery window triggers an SLA alert on the merchant side.
Toggle Return / Exchange on or off.
If enabled, set the return/exchange window (default 7 days; editable, e.g. 2 or 10 days) and eligibility.
Add any specific eligibility conditions in the optional details field (e.g. product must be unused, tags intact).
Configure Cancellation:
Not Allowed — disables cancellations entirely.
Allowed — choose the condition: “product not yet fulfilled” OR “within X days of placing the order.”
Choose scope: applies to all orders, or COD orders only.
Cancellation window logic example:
Note: Cancellations and address changes processed by the bot are auto-updated on the connected store (e.g. Shopify) — no manual sync required.
Note: For address changes, the bot requires a specific format: full name, PIN code, and locality, before updating the order address.
Note: Queries outside these configured policies are not handled by the bot and are routed directly to an agent.
Note: Order-status/reference queries are detected via keyword matching (e.g. “where is my order,” “need my order reference”); the bot collects details and hands off to an agent.
Click Save and Next / Save to complete the Setup Wizard.
5. Tab 2 — Knowledge Sources
Section: “Upload Knowledge Documents — Upload product guides, policies, and FAQs. The bot references these for customer queries. Max 2 MB per file.”
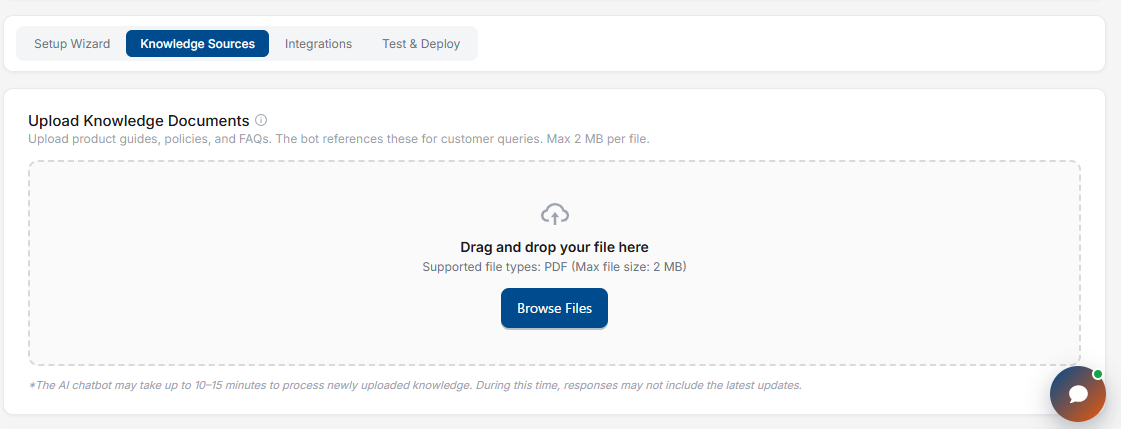
Figure 2: Knowledge Sources tab — document upload area.
This step is optional and can be added at any time.
Drag and drop a file into the upload area, or click Browse Files.
Field — Supported file types: PDF only, maximum file size 2 MB.
Note: The AI chatbot may take up to 10–15 minutes to process newly uploaded knowledge. During this time, responses may not include the latest updates.
The bot cites these documents when answering customer questions — think of it as anything you'd hand a new hire on day one (product guides, policy PDFs, internal FAQs).
Recommended approach: complete the Setup Wizard and Test & Deploy first, run testing for a day, identify response gaps, and only then upload supporting documents here to close those gaps.
6. Tab 3 — Integrations
Section: “Order Provider Configuration — Connect your logistics provider so the bot can look up real-time shipment tracking and order status.”
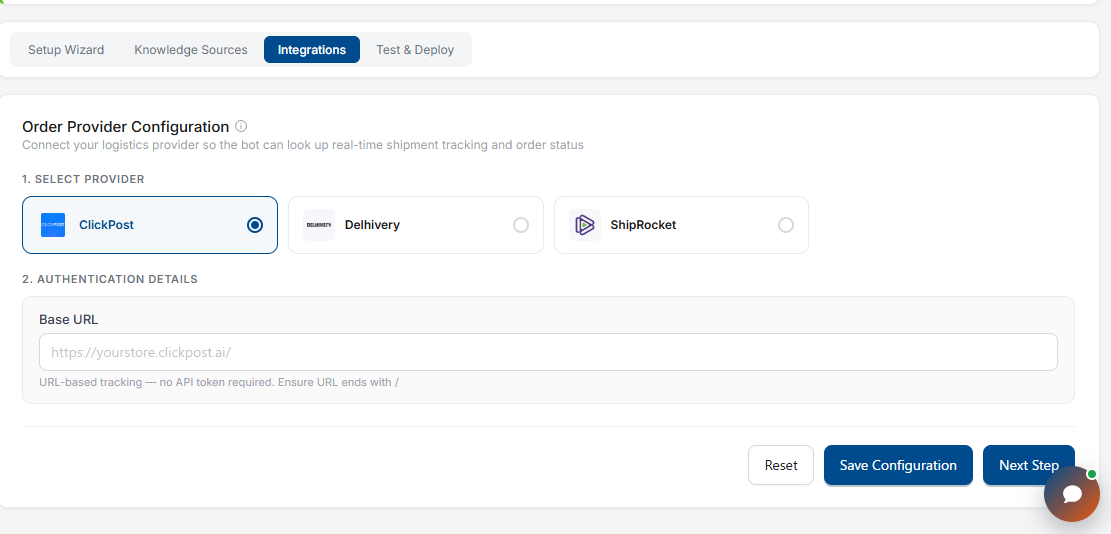
Figure 3: Integrations tab — Order Provider Configuration (provider selection + authentication).
6.1 Select Provider
Choose one logistics/tracking provider:
ClickPost
Delhivery
ShipRocket
6.2 Authentication Details
Field — Base URL: e.g. https://yourstore.clickpost.ai/
Note: This is URL-based tracking — no API token is required. Ensure the URL ends with a trailing “/”.
Click Save Configuration to store the settings, or Reset to clear the form.
Click Next Step to proceed once the provider is connected.
Once connected, the bot auto-fetches tracking details from the provider and handles shipment/tracking questions without manual intervention.
7. Tab 4 — Test & Deploy
Section: “Testing Sandbox — Enter a phone number to test your chatbot before going live.” This tab typically only becomes fully usable once the Setup Wizard steps are completed. The sandbox is fully isolated from the live bot — nothing sent there reaches real customers.
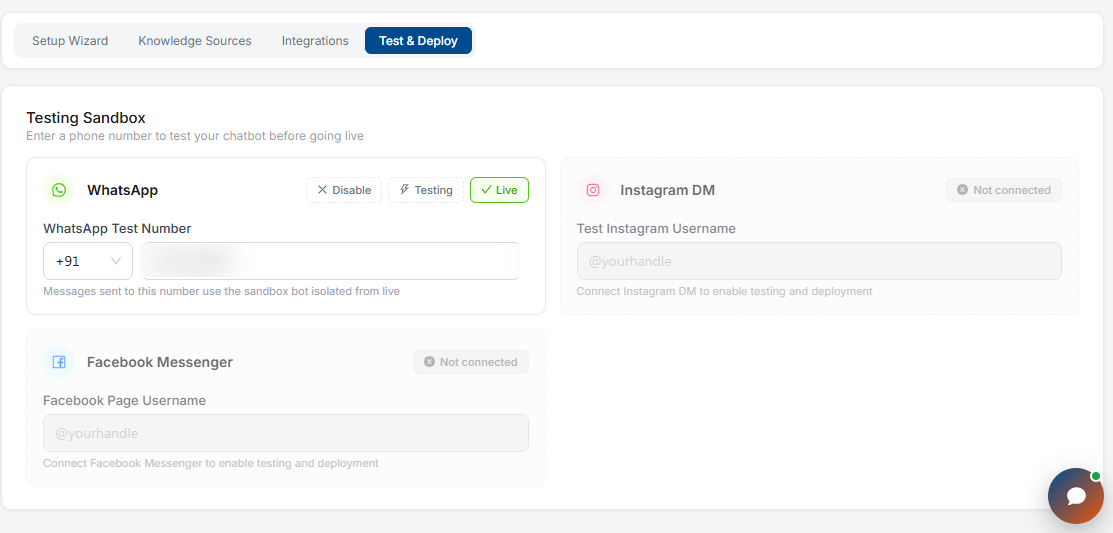
Figure 4: Test & Deploy tab — Testing Sandbox (WhatsApp, Instagram DM, Facebook Messenger). Test phone number blurred.
Note: The bot is live today on WhatsApp, Instagram DM, and Facebook Messenger. Email and Web Chat are planned for a future update.
Note: Channels can be rolled out one at a time, on the brand's own schedule — all three do not need to go live simultaneously.
7.1 WhatsApp
Field — Status: Disable / Testing / Live — select the appropriate state for the current stage.
Field — WhatsApp Test Number: Country code + number, e.g. +91 XXXXXXXXXX.
Note: Messages sent to this number use the sandbox bot, isolated from the live/production bot.
Recommended flow: keep status on Testing while validating responses; only switch to Live once testing is complete and feedback has been incorporated.
7.2 Instagram DM
Field — Test Instagram Username: e.g. @yourhandle.
Shown as “Not connected” until linked. Connect Instagram DM to enable testing and deployment on that channel.
7.3 Facebook Messenger
Field — Facebook Page Username: e.g. @yourhandle.
Shown as “Not connected” until linked. Connect Facebook Messenger to enable testing and deployment on that channel.
7.4 Running a Test
Message the sandbox number/handle from the test phone/account configured above.
Ask a range of realistic customer questions: product details, shipping/order status, cancellations, returns, FAQs, etc.
Note any incorrect, incomplete, or off-tone responses.
7.5 Guide Your AI Expert — Giving In-Panel Feedback (Inbox)
Go to Chats → Inbox in the left navigation panel.
Once a test message is sent, the conversation appears here as a live chat.
Every AI reply in the inbox carries a “not quite right?” option (shown as a tooltip or icon on the message) — open it on any reply that needs correcting.
Use it to: fix or add information the bot didn't know, correct a wrong fact (e.g. an outdated delivery estimate), or change how it responds (e.g. always ask for an order number first).
Submit the correction — it trains the bot for this store specifically. The bot improves the more it is corrected and used.
8. Agent Accounts (Setup → Agents)
Separate from the Agent Handoff escalation rules (Section 4.2), this is where individual agent logins are created so escalated chats have someone to land with.
In the left navigation panel, go to Setup → Agents.
Create a login for each team member who should handle escalated/handed-off chats.
Agents created here get access limited to the Chat/Inbox panel.
The bot hands off to these agents whenever an Agent Handoff rule is triggered (e.g. customer asks for support, an escalation condition, or a refund request).
9. Recommended Rollout Sequence
Complete the Setup Wizard: Brand → Agent Handoff → FAQ → Policies.
Create agent accounts (Section 8) so escalations have somewhere to land.
Skip Knowledge Sources and Integrations initially unless the documents/provider details are already on hand.
Confirm the status banner shows the bot as indexed/ready.
Go to Test & Deploy, set the relevant channel(s) to Testing, and run the bot through realistic customer queries.
Log feedback via the Inbox “not quite right?” option (or a shared tracking sheet) for every gap found.
Review feedback, tune responses/policies/knowledge sources as needed, and re-test.
Once responses are consistently accurate, switch the channel status from Testing to Live — channels can be rolled out one at a time.
10. Example Scenarios
Illustrative situations that show the pieces above working together.
Live the same day: a new brand sets brand voice, handoff rules, FAQs, policies, and logistics through the wizard, tests in the sandbox, and takes WhatsApp live the same afternoon.
Same answer, every channel: one customer asks “where's my order?” on Instagram, another on WhatsApp — both get the same answer, in the brand's tone, with live tracking status.
Bringing in a human: the bot recognizes an escalation phrase (e.g. “this is unacceptable”), hands the conversation to an agent with full context, and the customer never has to repeat themselves.
Correcting in seconds: an agent spots the bot quoting an outdated delivery estimate, opens the “not quite right?” option, corrects it, and the bot stops repeating the outdated answer.
11. Pricing & Availability
The Omni-Channel AI Bot is a paid add-on — a fixed monthly fee (where applicable) plus usage-based charges.
Pricing is finalized with the brand's KwikEngage point of contact before setup begins.
Live channels today: WhatsApp, Instagram DM, Facebook Messenger.
Coming in a future update: Email, Web Chat, and automated re-engagement for drop-offs.
12. Key Things to Get Right the First Time
Brand name — cannot be edited after the first save.
Industry/category — directly shapes how the bot answers product-related queries.
Cancellation and return windows — set the correct time window (in days) and order scope (all orders vs. COD only), since these trigger automatic, irreversible actions (order cancellation, address updates) on the connected store.
Integration Base URL — must end with a trailing “/” for tracking lookups to work.
Sandbox vs. Live status — confirm the channel is set to Testing before sharing the test number/handle internally, so real customers on the live channel aren't affected.
Talk to a human cannot be disabled as an escalation trigger — plan agent staffing accordingly.
Was this article helpful?
That’s Great!
Thank you for your feedback
Sorry! We couldn't be helpful
Thank you for your feedback
Feedback sent
We appreciate your effort and will try to fix the article