How to create and use Tags (Multi-Level Tagging)
Applies to: Kwik Engage Inbox · Admins, Supervisors and Agents
Tags are how you categorise the customer queries that come into your support channels. With Multi-Level Tagging, you can now organise tags into a hierarchy of up to three levels — a top-level category, a sub-type, and a root cause — so your team can tag conversations precisely and you can analyse why customers are reaching out, not just that they did.
This article covers what multi-level tags are, how admins set them up, how agents apply them on a conversation, how to filter by tags, and how tags appear in analytics and reports.
Good to know: If you already use tags today, nothing breaks. Your existing tags automatically become Level 1 tags, and every ticket keeps the tags it already has. Adding sub-levels is completely optional — see Migration & backward compatibility at the end.
What's new at a glance
| Before | Now |
|---|---|
| One flat list of tags | Up to 3 levels: Level 1 → Level 2 → Level 3 |
| One tag per category | Tag chains (e.g. Cancellation › Changed mind › Found better offer) |
| Scroll a long list to find a tag | Drill-down picker + search across all levels |
| Analytics grouped by a single flat tag | Drill-down analytics by level, with resolution time and CSAT per chain |
One tag column in exports | New tag_l1, tag_l2, tag_l3 columns (the original tag column is retained) |
Key concepts
- Level 1 (L1) — the top-level category (e.g. Cancellation, Refund, Delivery).
- Level 2 (L2) — a sub-type under an L1 (e.g. COD cancellation).
- Level 3 (L3) — the root cause under an L2 (e.g. Changed mind).
- Tag chain — a full path applied to a ticket, e.g.
Cancellation › COD cancellation › Changed mind. A ticket can carry more than one chain. - Shared sub-tag — an L2 or L3 tag can sit under multiple parents, so you don't have to duplicate it (e.g. Delivery delay can live under both COD cancellation and Prepaid cancellation).
Part A — For Admins: creating and structuring tags
Only admins (and, where permitted, supervisors) can create and edit tags.
1. Open the Tags page
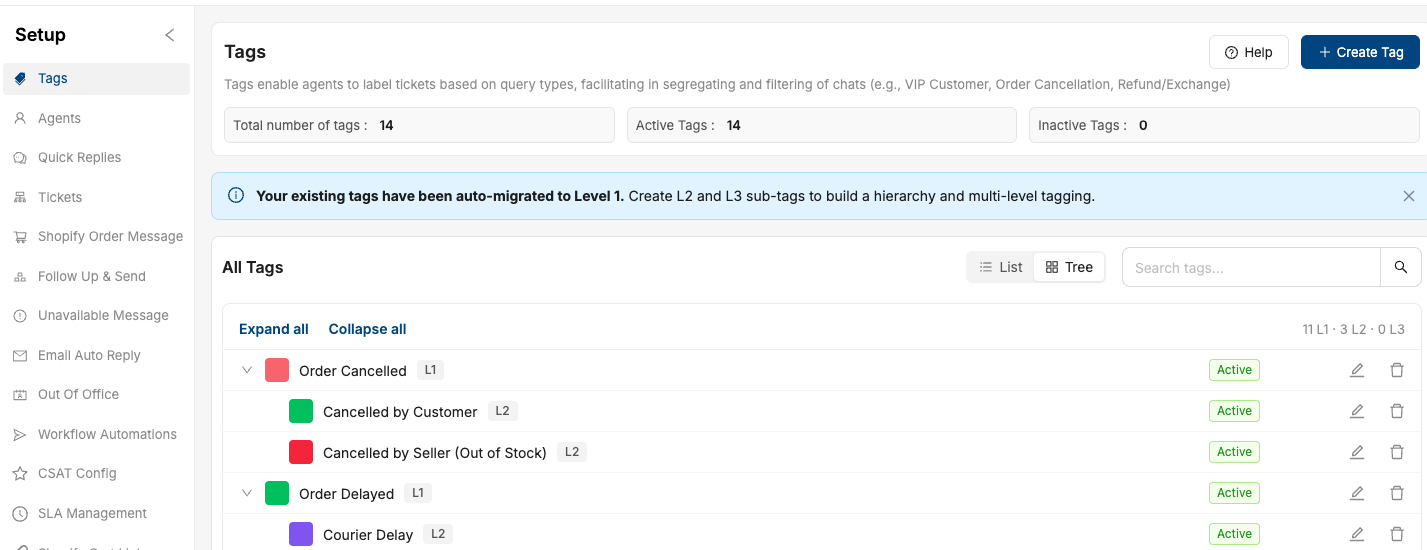
Go to Chats → Setup → Tags (or open https://app.kwikengage.ai/settings/tags).
You'll see all your tags. Use the List View for a simple list, or switch to Tree View to see the full parent-child hierarchy.
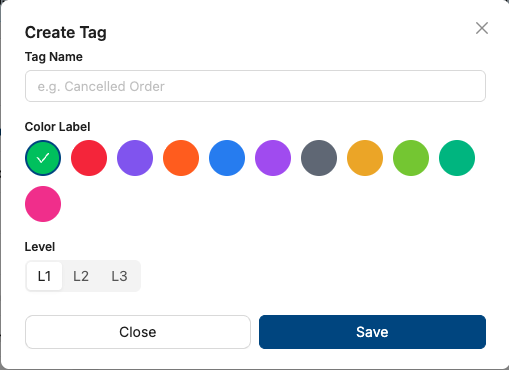
2. Create a Level 1 (top-level) tag
- Click Create Tag.
- Enter a clear, specific name (e.g. Cancellation, Refund, Track Order).
- Leave the Level set to Level 1.
- Choose a colour.
- Click Save.
Your new top-level category now appears in the list.
3. Create a Level 2 or Level 3 tag (with a parent)
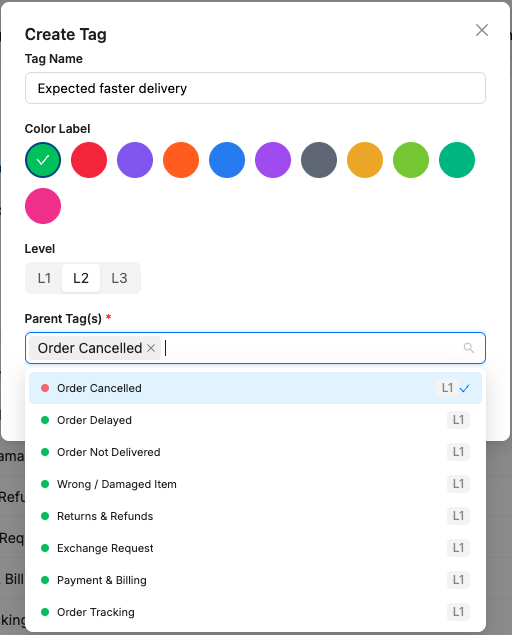
- Click Create Tag.
- Enter the name (e.g. COD cancellation for L2, or Changed mind for L3).
- Set the Level to Level 2 or Level 3.
- In the Parentfield, select one or more parent tags:
- A Level 2 tag must sit under at least one Level 1 tag.
- A Level 3 tag must sit under at least one Level 2 tag.
- Choose a colour and click Save.
Tip — shared sub-tags: In the Parent field you can pick multiple parents. For example, add Delivery delay once and attach it to both COD cancellation and Prepaid cancellation — it will appear under both, with no duplicate tag to maintain.
4. Review your hierarchy in Tree View
Switch to Tree View to see the full structure. Expand and collapse any branch, and look for the shared-tag indicator on sub-tags that belong to more than one parent.
5. Edit, re-colour or deactivate a tag
- Edit a tag to rename it, change its colour, change its level, or add/remove parents.
- Deactivate a tag you no longer want agents to apply — historical tickets keep it for reporting, but it won't appear in the apply list.
Validation rules to keep in mind
- A Level 2 tag needs at least one Level 1 parent; a Level 3 tag needs at least one Level 2 parent. You can't save a sub-tag without a valid parent.
- The maximum depth is 3 levels.
- Tag names should be unique and descriptive so agents and analysts can tell them apart.
Part B — For Agents: applying tags to a ticket
Applying a multi-level tag is designed to stay fast — usually just a click or two.
Apply a full tag chain (drill-down)
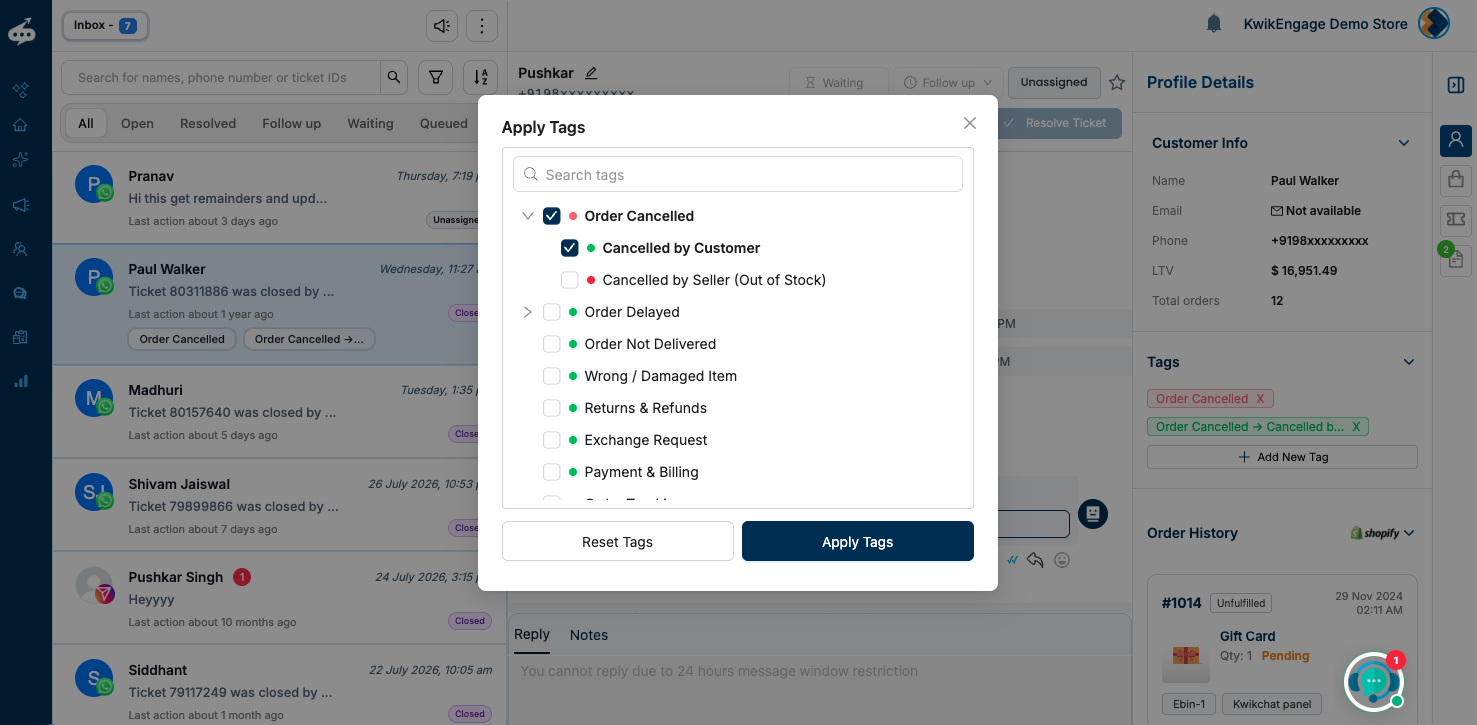
- In the open ticket, open the Tags panel and start adding a tag.
- You'll see the Level 1 categories first. Click one to drill down to its Level 2 options, then to Level 3.
- A breadcrumb at the top shows where you are; use it to step back a level.
- When you reach the level you want, apply it. The applied chain appears as a removable pill (e.g.
Cancellation › COD cancellation › Changed mind).
You don't have to go all the way to Level 3 — you can stop at Level 1 or Level 2 as well.
Search across every level
Start typing in the tag search box. Results match tags at any level and show the full path (e.g. Refund › Initiated, not credited). Clicking a result applies the whole chain in one step — no drilling required.
Apply multiple chains, and remove them
A single ticket can carry several chains at once — for example a Cancellation chain and a Refund chain. Duplicate chains are prevented automatically. To remove a tag, click the × on its pill; removing a parent removes the chain beneath it.
Agent quick reference
Keep this handy — tagging a ticket takes just a few seconds.
Tag a conversation in 3 steps
- Open the Tags panel on the conversation.
- Click a category to drill down (Level 1 → Level 2 → Level 3), or search and pick the full path.
- The applied tag appears as a pill. Add more chains if needed.
Do
- Tag the most specific level that's true — the root cause (Level 3) is what powers the best reports.
- Add multiple chains when a conversation covers more than one issue (e.g. cancellation and refund).
- Use search when you know the tag name — it's faster than drilling down.
Don't
- Don't leave a resolved conversation untagged — it won't show up correctly in reports.
- Don't force a Level 3 if it doesn't fit — stopping at Level 1 or 2 is fine.
Part C — Filtering conversations by tag
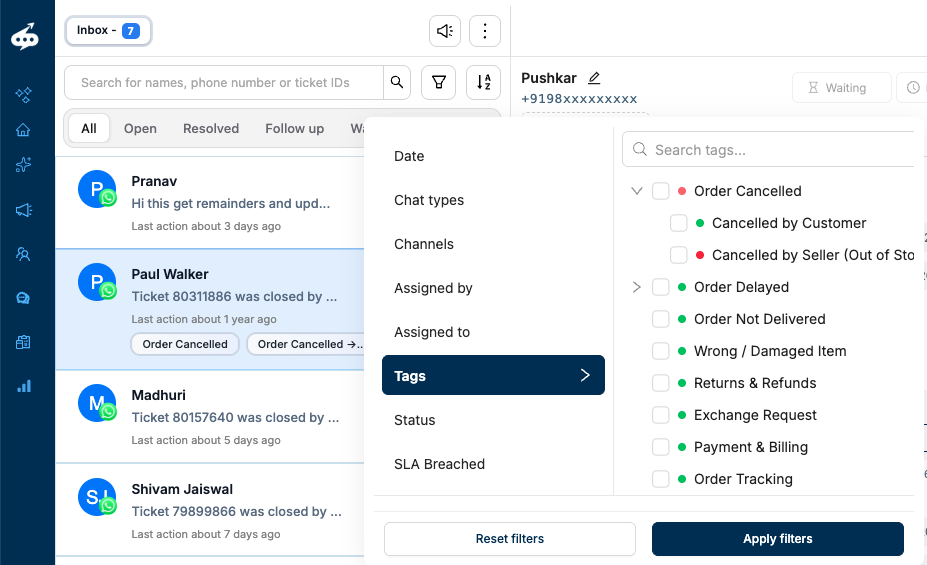
In the Inbox filter panel, you can search by Tags.
- Multi-select is supported: selecting several tags within the same level matches tickets with any of them (OR); selecting tags across levels narrows the results (AND).
- The active filter chips reflect the exact path you've selected.
Part D — Tags in Analytics & Reports
Multi-level tags make your reporting far more actionable.
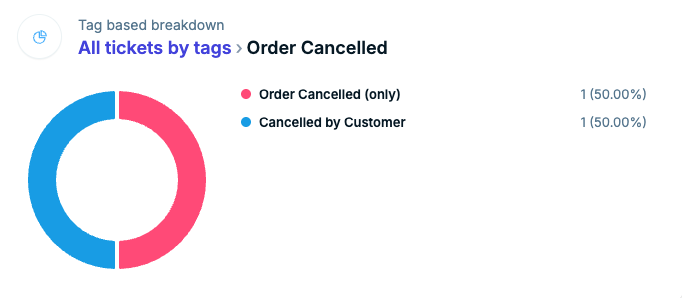
"Tickets by Tags" — drill-down chart
By default the chart groups tickets by Level 1, so you see a clean set of top-level categories instead of dozens of flat tags. Click a slice to drill into its Level 2, then Level 3, with a breadcrumb to go back up. Tickets tagged only at a higher level are grouped into an "Others" slice at the deeper level.
Exports (CSV / Excel)
Ticket exports now include three new columns — tag_l1, tag_l2 and tag_l3 — with one row per tag chain per ticket. The original tag column is retained (it holds the Level 1 value) so any existing spreadsheets or integrations keep working.
Migration & backward compatibility
When Multi-Level Tagging is enabled for your account:
- All your existing tags automatically become Level 1 tags — names, colours and status are preserved.
- No ticket loses its tags, and all historical data stays intact.
- Analytics, workflow automations and API integrations keep working exactly as before (automations continue to match on the same tag).
- You'll see a one-time notice on the Tags page. Building out Level 2 and Level 3 is entirely optional and can be done tag-by-tag, whenever you're ready.
Best practices
- Start with your Level 1 categories — keep them broad and few (e.g. 8–15). Add depth only where it drives a decision.
- Reuse shared sub-tags (like Delivery delay or Payment issue) across parents instead of creating duplicates.
- Name for clarity — an analyst reading an export should understand a tag without extra context.
- Use Level 3 for root causes you actually plan to act on (e.g. reasons for cancellation you can influence).
FAQs
- Do I have to use all three levels?
- No. Use one, two or three levels — whatever fits the category. Many teams keep most categories at Level 1 and add depth only where it's useful.
- Can a sub-tag belong to more than one category?
- Yes. When creating or editing an L2/L3 tag, select multiple parents.
- Can a ticket have more than one tag chain?
- Yes — apply as many chains as apply (e.g. cancellation + refund). Duplicate chains are blocked.
- How do agents apply just the top-level tag quickly?
- Hover the tag and click + ("Add without sub-tag"), or press Shift + Enter.
- Will this change my exports or automations?
- Exports gain
tag_l1/l2/l3columns while keeping the originaltagcolumn. Automations that match on your existing tags keep working.
- Exports gain
Was this article helpful?
That’s Great!
Thank you for your feedback
Sorry! We couldn't be helpful
Thank you for your feedback
Feedback sent
We appreciate your effort and will try to fix the article